At ReInvent of 2018 AWS announced Transit Gateway. Transit Gateway is a managed service that allows you to connect multiple VPC’s from different accounts and on-prem connections through a single endpoint.
People who manage more then just a few accounts and need on-prem access during their transition to the cloud often use VPN tunnels, Direct Connect or other solutions provided by 3rd party providers like Cisco. Add VPC peering to that mix and you end up with quite a complex setup you need to manage. Transit Gateway can simplify this.
These images from the reInvent slides illustrate this in the case of VPN tunnels.
![]()
![]()
Optimise cost
At the customer where I’m currently working we have around 80 accounts and this number will probably increase further. So when Transit Gateway became available we were keen to test it to find out how it could reduce complexity. But reducing complexity was not the only factor, another one was cost.
From the current 80 accounts there are around 50 that have one or more VPC’s each with their own NAT gateway and VPN connection to on-prem. If you do the calculation of the monthly cost you end up with a rather high number.
Example
- Price per NAT gateway / hour = $0.048 ($1.15/day -> $34.56/month)
- $34.56 x 6 (2 VPC’s with subnets in 3AZs) * 50 accounts = $10368/month
This could be reduced to $34.56 x 3 = $103.68. Nice savings..
Transit Gateway acts as a central place to connect networks (basically route tables) so we came up with the idea of using NAT Gateways in the Transit Gateway account for all the attached accounts instead of using NAT Gateways in all the individual accounts.
I tried to describe the necessary steps to setup central NAT Gateways using Transit Gateway as clear as I could. The setup is actually quite simple but it might take some time to get your head around it.
Setup
Inspired by the Well Architected framework we decided to put all the Transit Gateway(s) in a separate AWS account (the Transit Gateway Account). This keeps things clean and we can limit access to this account which improves security which is imporatant since this will be a crucial part of our infrastructure.
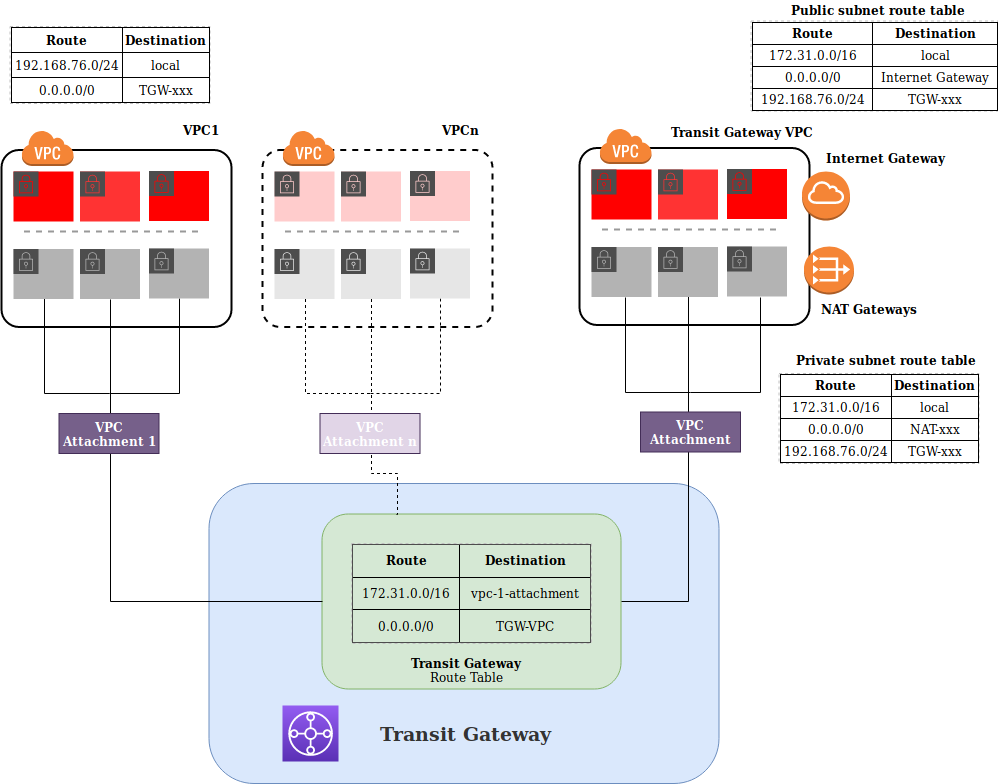
This diagram might help to understand the setup.
Setup a Transit Gateway
NOTE: The following steps are done in the Transit Gateway account!
Creating a Transit Gateway is rather straightforward. The following example creates a Transit Gateway with the default settings using the CLI.
| |
Once created you can get the details by running
| |
To make the Transit Gateway visible in your other account(s) we need to share it
using Resource Access Manager. Specify the AWS Account ID with the
--principals parameter
| |
NOTE: You can also share resources on an Organizational level which makes the resource available without the Pending Accept phase.
Configure a VPC to use Transit Gateway
NOTE: The following steps are done in a regular account!
Now that the Transit Gateway is created and shared we can attach a VPC from the account we shared the Transit Gateway with.
Check resource share invitations
Run the following command to get a list of resource share invitations.
| |
Accept the resource share
Use the resourceSahreInvitationArn property from the output in the previous step.
| |
Get the Transit Gateway info
Once we accepted the resource share we should see a Transit Gateway resource appearing in our account.
| |
Create the attachment
Now we can attach the private subnets from our VPC to the Transit Gateway. The
transit-gateway-id property can be found in the output of the previous command.
| |
Accept the attachment from the Transit Gateway account.
NOTE: The following steps are done in the Transit Gateway account!
First list the pending attachments
| |
Ok. If you were able to follow this without too much trouble you did a good job already. Almost there..
Transit Gateway VPC
To provide outgoing internet connectivity (NAT) we need to create a VPC with public and private subnets in the same AZ’s as we have in our other accounts. This is important because an instance in a given AZ will use the NAT Gateway in the Transit Gateway account that is deployed in the same AZ.
example: instance in AZ ID ’euw1-az3’ will use a NAT Gateway from the Transit Gateway account which is also deployed in euw1-az3.
I leave the deployment of the VPC as an exercise for the reader, but you should have public subnets with a default route to an Internet Gateway and private subnets each with a default route to a NAT Gateway. This is pretty standard and should not be too hard to do.
Once you have this VPC deployed you also need to attach this VPC’s private subnets to the Transit Gateway like we did for the account in the previous steps.
Transit Gateway VPC route tables
To allow traffic from established connections back in we need to configure the necessary routing so that traffic from the internet finds it’s way back to the subnets of the account were it originated from.
In this example the VPC subnet of the attached account is 192.168.76.0/22. So we
add a route to the route tables of the public and private subnets that
points to the Transit Gateway as a destination for this network.
Route table private subnet A
Route table private subnet B
Route table private subnet C
Route table public subnets
NOTE: If you have multiple accounts and use a larger CIDR block to carve smaller subnets from, you can use the larger CIDR block instead.
Transit Gateway Route Table
Each VPC attachment will be added associated to a Transit Gateway Route Table and the available networks of that VPC will be propageted into this route table.
When creating a Transit Gateway with the default settings, a default Transit Gateway Route table is created and VPC attachments are automatically associated and propagated to that route table. So each attachment has a route to all the other attachments
NOTE: If you create a Transit Gateway with no default route table association you need to do this manually.
Because we want to use the NAT Gateways in the VPC of the Transit Gateway to
connect the private subnets of all our other accounts to the internet we need to
add a static route to the Transit Gateway Route Table. The target for the
destination 0.0.0.0/0 will be the VPC in the Transit Gateway Account. We
basically send all traffic that is not destined for one of the attached subnets
to the VPC of the Transit Gateway. From that point on the route tables of the
Transit Gateway VPC are used.
Finishing
Ok, that were a lot of (not always obvious) steps but we are now set to remove the NAT gateways from all the VPC’s that are attached to the Transit Gateway and start using the NAT Gateways in the Transit Gateway VPC.
Take into account that NAT Gateways have a limit of 5Gbit/sec. We are currently not even close to that limit but might be different in your case. Keep an eye on those NAT Gateway metrics while migrating or adding accounts.
Need help? Feel free to contact us